It has been quite some time since the Cisco’s Cloud Services Router CSR1000v was publicly released. CSR1000v is a virtual router or in other words it run’s the IOS software inside a Virtual Environment (in a Virtual Machine), and that’s not all because it can run the latest IOS XE software which is the successor of the classic IOS software. Basically all the IOS XE releases which start from 3.x correspond to the new classic IOS 15.x releases, however we will not talk this time about the mappings of IOS to IOS XE software version, if you are interested you can visit the official link on Cisco.
Now running CSR1000v on GNS3 is not difficult as long as you know what you are doing, all you need is some basic knowledge of Virtual Machines and how to install one, because the CSR1000v run’s as a VM instance and we will map this instance with GNS3 so that in the background the CSR run’s on a VM but in GNS3 we can use it as a normal Router by creating different kind of network topologies to your needs.
What we need is, VirtualBox, GNS3, and the ISO image of CSR1000v. The image you can simply download from Cisco Products page, of course you need to have a user account, but I believe even with a free guest account it’s still possible to download the image file, give it a try.
Today the latest IOS XE for CSR1000v is 3.12 so I downloaded this one and proceeded with installing it on VirtualBox. See the VM settings below on the picture, I decided to give it 3Gig of RAM to the VM which should be a minimum requirement for running the CSR1000v, having a more powerfull machine and giving it more memory would tackle for better performance of the VM for sure, that’s up to you. Make sure the IDE Secondary Master is configured to boot the CSR image from your disk at the beginning until it is fully installed and than you can remove this one. Network adapters, according to your needs you can add or remove but just make sure you have them configured settings as per the picture below:

After starting the VM machine you should see the installation progress, there’s nothing you have to do at this time, if you see an output similar to the one below that’s a sign you are in a good way:

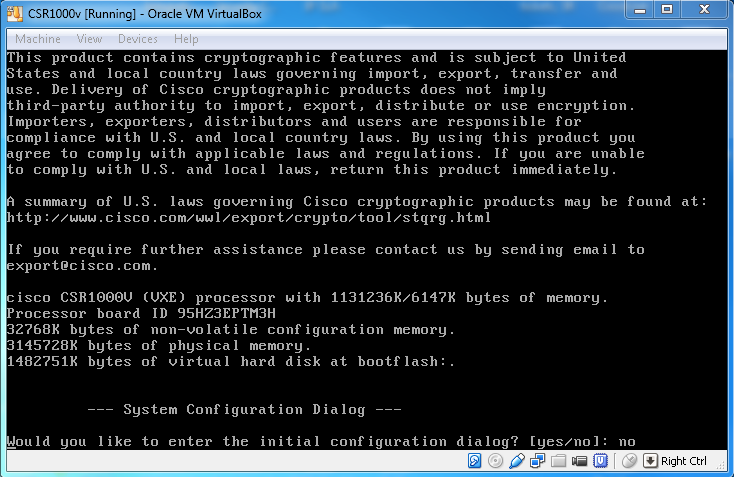
Next thing you should see as the installation is finishing is the System Configuration Dialog, if error’s doesn’t show up until now it means the CSR1000v software was installed successfully as per the picture below:
Now you can start and play with the IOS XE based Cloud Services Router (CSR1000v).
After successfully installing the CSR on VirtualBox we would like to run it and use on GNS3, and that’s the easiest part, open GNS3 and go to Edit>Preferences, click on the VirtualBox section and you General Settings tab and VirtualBox Guest tab. I would suggest at this point to stay on General Settings tab and click on the “Test Settings” button so that GNS3 detects your current VirtualBox settings, after completing this step click on the VirtualBox Guest tab and configure the settings as per below example on the picture (hint: click the Refresh VM List if the VM List doesn’t show the CSR1000v).

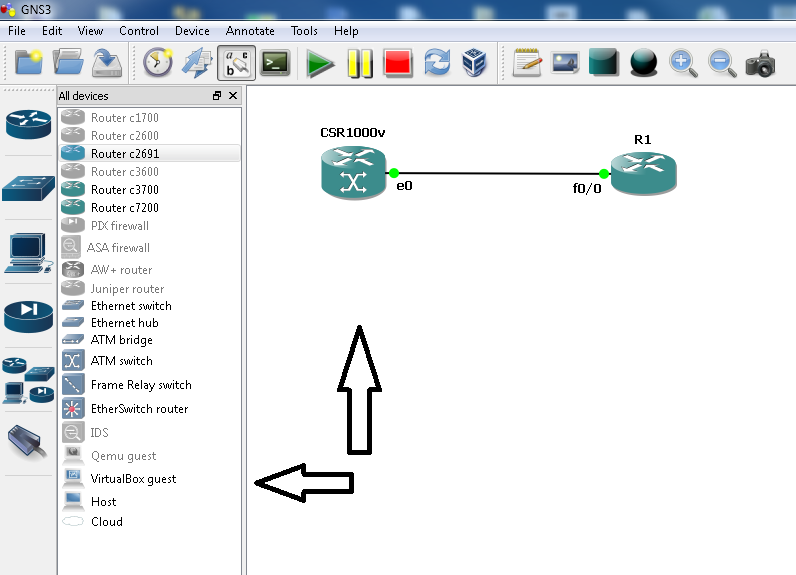
By now we should be able to fire up the CSR1000v and use in GNS3 via the VirtualBox guest icon on the Devices List in GNS3. As you can see on the Picture below I have added one CSR1000V and a Cisco 2691 Router and connected them together for testing purposes:
After starting both the Routers on GNS3 you can access the CSR1000v via console the same way as you would with other types of Routers on GNS3, in this way you don’t have to work on the VirtualBox console anymore instead use your preferred console access application. Picture is an example of show version command I ran on the CSR1000v from console on GNS3:

This is a good way to have CSR1000v working via GNS3 because a lot of people are struggling to have them working but seem’s like it’s not so hard to do it.
And last, for all CCIE R&S candidates this would be very beneficial since the v5.0 LAB exam runs based on IOS XE software, so having CSR1000v running on your own is the best thing you can do without having to buy Real devices. And most of the CCIE R&S training vendors as I see run the CSR1000v on their training sessions, so I believe having a powerful machine running Virtualization you can create your own lab topologies or run the topologies from the Training vendors without any problem using the CSR1000v.
NOTE: VirtualBox is not officially a supported Hypervisor for CSR1000v according to Cisco, so you should expect having issues from time to time. In order to have a fully operational CSR1000v use one of the official supported Hypervisors by Cisco like VMware ESXi, Citrix XenServer, Microsoft Hyper-V or KVM.
Categories: General Networking

Leave a Reply